Laser White Paper - Laser marking under the microscope
In addition to industrial coding and marking with ink, laser-based marking of products is becoming increasingly established in the marking of products and packaging.

The ink used is a decisive factor in product markings using ink. Users have a constantly growing selection of inks to choose from, which differ in terms of color, light resistance, drying behavior and many other properties. A perfect print result can only be achieved by selecting the optimum ink. In the rarest of cases, the marking ink has an influence on the product surface or its properties.
In contrast, laser marking is always carried out by processing the material and changing the surface of the substrate to be marked. Depending on the material, the laser and the individual setting parameters, a wide variety of effects are possible, such as engraving, removal of a covering layer, color changes or foaming of the surface.
Important issues
It is not only the readability and permanent nature of the laser marking that play an important role. It is essential for manufacturers to know whether and how the properties of the product are affected by laser processing. The REA Coding and Marking Systems experts have set themselves the task of not only developing optimum coding and marking systems for almost every marking task, but also providing answers to questions that go beyond this. An increasingly frequent issue in laser applications concerns the influence of the material to be marked, such as material weakening, material throw-up, engraving depth and more.
Precise answers
In order to be able to provide individual and clear answers to these further questions and to eliminate risks for the user, REA JET not only invests in the further and new development of marking systems, but also in analysis technologies for inspecting and evaluating the marking carried out
Development of coding and marking systems, but also in analysis technologies for inspecting and evaluating the marking that has been carried out. In addition to the in-house optical code verification devices for 1D and 2D Codes from the REA VERIFIER brand, this recently included a digital 3D microscope for the quantitative measurement of surface structures.
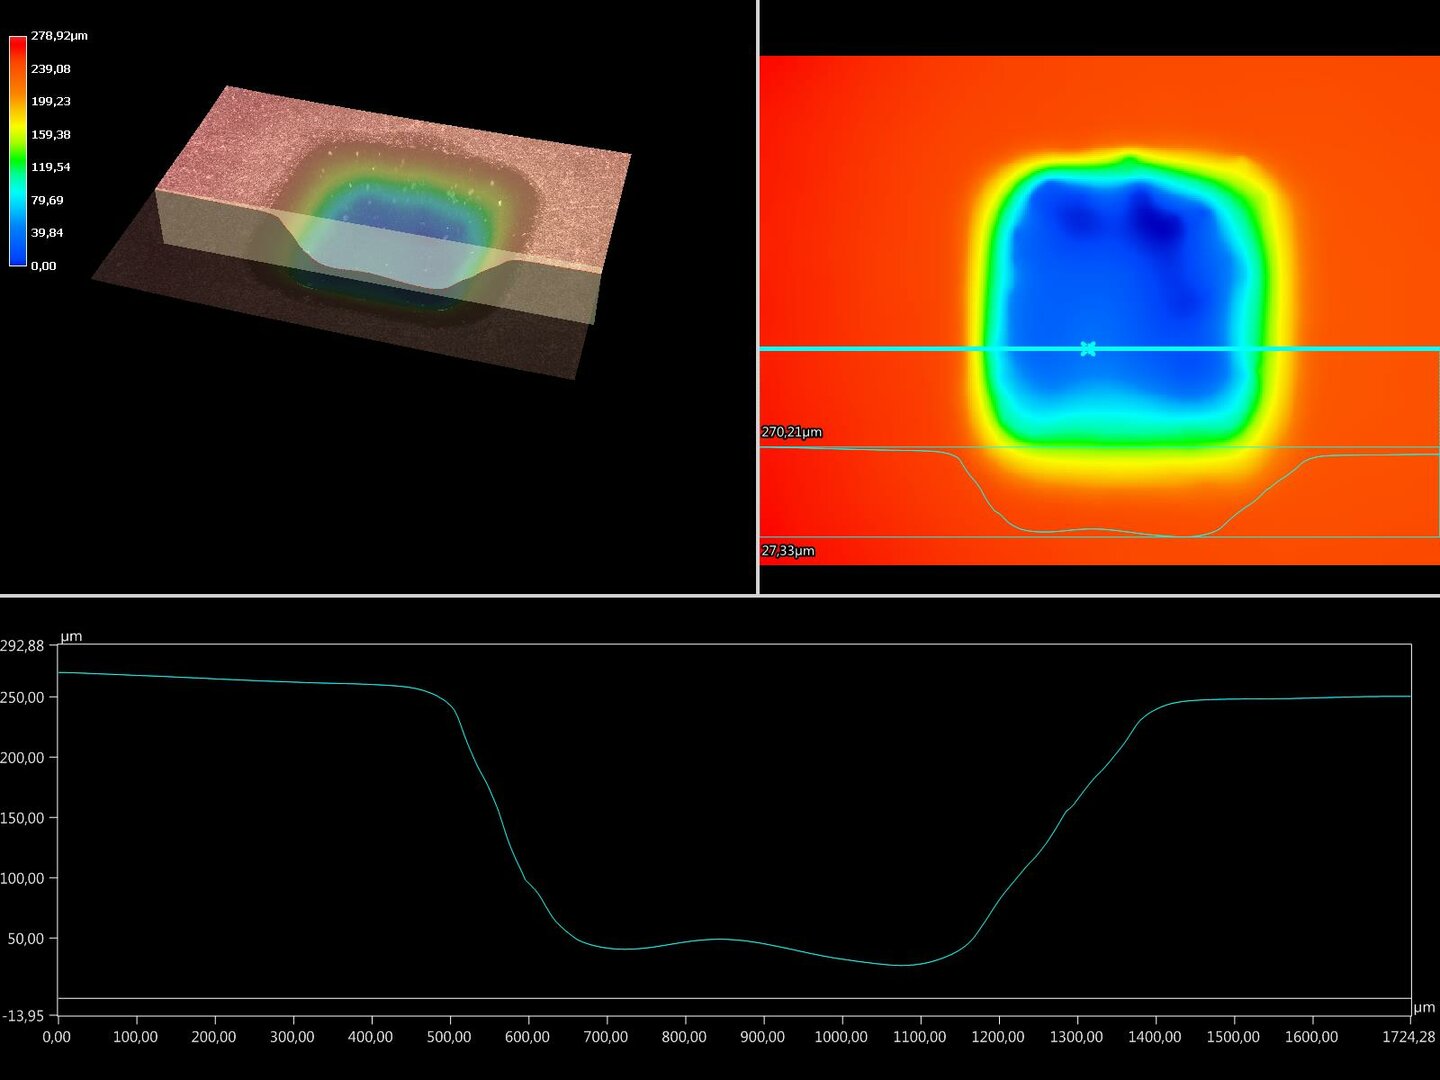
With the help of this microscope technology, the experts at REA are not only able to provide visual impressions through simple microscope images, but also to make detailed and quantitative statements about the height profiles produced during laser marking. These are not limited to a punctual measurement of a height or depth, but include a µm-accurate analysis of the entire area of the marking. Numerous additional functions allow the marking to be analyzed according to the user's wishes and needs.
These include, for example, the creation of a section profile, the determination of the maximum height and depth from a 2-dimensional height profile, the determination of their distance and the determination of volume. REA's marking experts can therefore analyze each laser pattern in detail and provide laser technology users with well-founded statements about the influence of laser marking on the product surface and wall thickness of their products.
Material weakening?
Nowadays, beverage bottlers mark almost 100% of their products with laser marking. When engraving PET bottles using a standard CO2 Laser at 10.6 µm, there is a dangerous risk of material weakening and even perforation. During marking, the material is displaced to the sides. What remains is a clear engraving with lateral material build-up, which results in an undesirable significant reduction in the wall thickness of the PET material.
To avoid this, CO2 Lasers with a wavelength of 9.3 µm are used nowadays. In this case, microscope technology can show exactly how the laser marking with the different wavelength affects the surface.
It turns out that marking with 9.3 µm does not result in engraving, but in foaming of the material. This even results in a strengthening of the material, which in turn can lead to better stability of the product.
Corrosion protection?
Other applications are aimed at processing the top layer of a product with the laser, for example. As these top layers often have both optical and protective functions for the substrate material underneath, the challenge is to achieve maximum readability of the laser marking while minimizing layer removal. Using state-of-the-art microscope technology, the experts at REA are able to determine the exact depth to which the laser beam penetrates the material.
This ensures that the top layer is only removed to a precisely defined thickness and that the protective function of the top layer remains unaffected.
A common application in the metalworking industry is the galvanizing of metallic surfaces to protect against corrosion. The section through the microscope image shows a maximum penetration depth of 6 µm. This demonstrably and verifiably ensures that the corrosion protection is retained even after laser marking.
Lifelong readability?
However, there are also often applications where, in contrast to this, great importance is attached to the deepest possible engraving. For example, the marking on metallic materials should still be easily recognizable even after a painting process.
In the case of laser marking on rubber, the aim is often to achieve a minimum depth of marking so that the marking remains clearly readable throughout the entire product life, even after the top layers of the material have worn away. One example is the marking of rubber with QR codes. An engraving depth of 250 µm is measured under the microscope. In this case, the analysis confirms the corresponding longevity of the code, which can still be read even after heavy material abrasion.
Material ejection?
In addition to classic marking tasks, laser systems are also used to cut out material. For example, lasers can be used to create closely spaced holes as perforations in plastic rolls. This raises the question of how much material is produced at the cut edges. The locally different material thicknesses produced by the material throw-up can lead to undesirable effects when the goods are rolled up. With the microscope technology, REA is able to provide exact information on the material throw-up and material properties.
In this case, the determination of the material throw-up (extreme value determination) when cutting plastic film resulted in a maximum throw-up of 100 µm, which did not pose an obstacle to rolling up the foil.
Conclusion
The use of the 3D microscope has significantly improved the quality of advice at REA JET. Thanks to the well-founded analysis method, the optimum laser system for the customer's respective application can be determined and recommended from a large number of possible system configurations. This includes the type of laser marker(fiber laser or CO2 Laser), the wavelength, the focal length of the focusing lens, the scan head and the marking parameters to be selected.
In addition, the REA experts are able to provide the user with well-founded and precise answers to the question of the influence of laser marking on the material. An information advantage that should not be underestimated.

